
In the first part of this series I presented a solution for developing on a Windows PC a Maven managed Java applications with NetBeans and then deploying it to a Raspberry Pi. In this part I will look at at a solution that allows you to accomplish these tasks from within NetBeans. It will work with any version of Windows and Linux.
Solution #2 Running an external command from Maven
For this solution you will need an additional program on your Windows PC. You need a program that will allow you to interact with a Raspberry Pi or any Linux system from the command line in Windows. This is necessary because we will write a script that will carry out the required tasks.
For this solution I have chosen WinSCP as my tool for connecting to the Pi, uploading a file or files and then executing the file. It is not the only solution but its ability to run a script when executed makes it an ideal choice. You can find WinSCP at https://winscp.net/eng/index.php . Here is a direct link to the download: https://winscp.net/download/winscp577setup.exe . Once installed you should add its location to the System PATH so that it can be run easily from the command line.
Test it with a script. Here is a script from for my MavenWinToPi project from the previous article. Save the script as wintopi.txt in the root folder of the MavenWinToPi project.
open scp://pi:raspberry@192.168.0.92 -hostkey="*"
put target\MavenWinToPi-1.0-SNAPSHOT.jar
call java -cp java -cp MavenWinToPi-1.0-SNAPSHOT.jar com.kenfogel.mavenwintopi.MavenWinToPi
close
exit
This script will:
- Open a session between the PC and the Pi accepting any ssh key from the pi
- Copy the jar file from the PC to your home directory on the Pi. You can place it any folder by adding a path at the end of the put command.
- Execute command line java to run the jar file you copied. If you are using a directory other than home, then you will have to include the full directory path to the jar file.
- Close the session
- Exit WinSCP
There are two programs named WinSCP that are installed. One is WinSCP.exe that produces a GUI display similar to Filezilla. You could use WinSCP in place of Filezilla in solution #1. The other is WinSCP.com that is the command line version and is the one we want to use.
The script assumes that it is running in the root of the project so remember to save the script to this folder. The pom.xml file is also in the project root. Open a console, improperly called the Command Prompt by Microsoft, in the root folder of the project and test the script by entering at the command line:
WinSCP.com /script="wintopi.txt"
If it fails because WinSCP.com cannot be found, then use its location in the command such as it is on my system.
"C:\Program Files (x86)\WinSCP\WinSCP.com" /script="wintopi.txt"
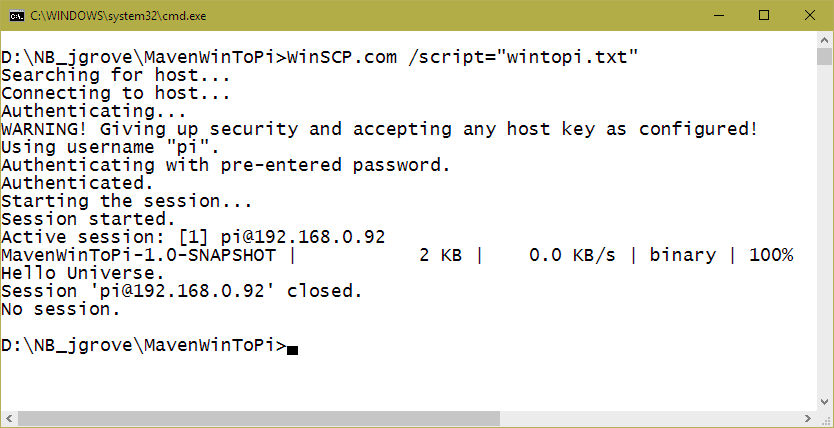
If you can see “Hello Universe.” You know it has worked. Don’t panic over the WARNING! message. It is a result of using a wildcard for the -hotkey switch. Once you decide to go production you should carefully examine security. Now its time to make Maven execute WinSCP.com and the script.
Get Maven to do the work
To have Maven execute WinSCP and its script we need to add to the pom.xml file. Here is the original pom.xml as generated by NetBeans.
<?xml version="1.0" encoding="UTF-8"?>
<project xmlns="http://maven.apache.org/POM/4.0.0" xmlns:xsi="http://www.w3.org/2001/XMLSchema-instance" xsi:schemaLocation="http://maven.apache.org/POM/4.0.0 http://maven.apache.org/xsd/maven-4.0.0.xsd">
    <modelVersion>4.0.0</modelVersion>
    <groupId>com.kenfogel</groupId>
    <artifactId>MavenWinToPi</artifactId>
    <version>1.0-SNAPSHOT</version>
    <packaging>jar</packaging>
    <properties>
        <project.build.sourceEncoding>UTF-8</project.build.sourceEncoding>
        <maven.compiler.source>1.8</maven.compiler.source>
        <maven.compiler.target>1.8</maven.compiler.target>
    </properties>
</project>
We need to add a build section and in this section we need to add an exec plugin. Here is the new pom.xml:
<?xml version="1.0" encoding="UTF-8"?>
<project xmlns="http://maven.apache.org/POM/4.0.0" xmlns:xsi="http://www.w3.org/2001/XMLSchema-instance" xsi:schemaLocation="http://maven.apache.org/POM/4.0.0 http://maven.apache.org/xsd/maven-4.0.0.xsd">
    <modelVersion>4.0.0</modelVersion>
    <groupId>com.kenfogel</groupId>
    <artifactId>MavenWinToPi</artifactId>
    <version>1.0-SNAPSHOT</version>
    <packaging>jar</packaging>
    <properties>
        <project.build.sourceEncoding>UTF-8</project.build.sourceEncoding>
        <maven.compiler.source>1.8</maven.compiler.source>
        <maven.compiler.target>1.8</maven.compiler.target>
    </properties>

    <build>
        <plugins>
            <plugin>
                <groupId>org.codehaus.mojo</groupId>
                <artifactId>exec-maven-plugin</artifactId>
                <version>1.5.0</version>
                <executions>
                    <execution>
                        <phase>install</phase>
                        <goals>
                            <goal>exec</goal>
                        </goals>
                    </execution>
                </executions>
                <configuration>
                    <executable>WinSCP.com</executable>
                    <arguments>
                        <argument>/script="wintopi.txt"</argument>
                    </arguments>
                </configuration>
            </plugin>
        </plugins>
    </build>
</project>
The Maven exec plugin is usually used to indicate which class contains the main method and or to add switches or arguments to the execution of a Java program. In my example I am using the plugin’s additional capability to run any type of executable. In this case the executable is WinSCP.com and the argument points to the script. To carry this out the command must be associated with a specific phase. In this case it is the ‘install’ phase when the fully assembled jar file is stored in the local maven repository.
Only use Build or Clean and Build
In NetBeans the install phase occurs at the end of a Java build. This means that if you do a Build or a Clean and Build the executable will run. Unfortunately, if you use the Run command in NetBeans it executes WinSCP.com but immediately declares a bad host error. Therefore, only do a Build or Clean and Build when using this technique for working with a Raspberry Pi
When you do the build you will see the output of the WinSCP program as well as the output of the program from the Raspberry Pi. It is almost indistinguishable from NetBeans’s native capability to run code remotely. Here is what should appear in the Output window of NetBeans:
Installing D:\NB_jgrove\MavenWinToPi\target\MavenWinToPi-1.0-SNAPSHOT.jar to E:\dev\.m2\com\kenfogel\MavenWinToPi\1.0-SNAPSHOT\MavenWinToPi-1.0-SNAPSHOT.jar

Installing D:\NB_jgrove\MavenWinToPi\pom.xml to E:\dev\.m2\com\kenfogel\MavenWinToPi\1.0-SNAPSHOT\MavenWinToPi-1.0-SNAPSHOT.pom

--- exec-maven-plugin:1.5.0:exec (default) @ MavenWinToPi ---
Searching for host...
Connecting to host...
Authenticating...
WARNING! Giving up security and accepting any host key as configured!
Using username "pi".
Authenticating with pre-entered password.
Authenticated.
Starting the session...
Session started.
Active session: [1] pi@192.168.0.92
target\MavenWinToPi-1.0-SNAPSHOT.jar |           2 KB |    0.0 KB/s | binary | 100%
Hello Universe.
Session 'pi@192.168.0.92' closed.
No session.
------------------------------------------------------------------------
BUILD SUCCESS
------------------------------------------------------------------------
Total time: 3.833s
Finished at: Sun Jul 17 19:56:59 EDT 2016
Final Memory: 14M/243M
------------------------------------------------------------------------
You know that all is well because you can see the ‘Hello Universe.’ Message.
Exception
The technique described her in part 2 will only work for applications that only have console output. If you must interact with the program in the console or if the program has a GUI then you will have to use solution #1.
In the remaining articles in my IoT without the Breadboard series I will be using this technique. If you know a better way to accomplish this, then let me know about it and I will update this information.
Acknowledgement
I’d like to thank fellow NetBeans Dream Team member Johannes Weigend for pointing out that the maven exec plugin could be a solution.