
A little over three years ago I purchased a promise on Kickstarter called Kano. This was a kit consisting of a Raspberry Pi B+, case, keyboard, power supply, speaker and cables. Having good luck with Kickstarter, the promise became a reality and I received a Kano. While the kit was designed for younger users I saw it as a way to get involved with the Internet of Things.
For Xmas that year I put on my wish list a specific set of components that could allow me to interact with devices. What I received for Xmas was a big bag of parts, some components such as LEDs, temperature sensor and a small LCD display. I set as my first goal to turn on and off an LED. Here was my kit:
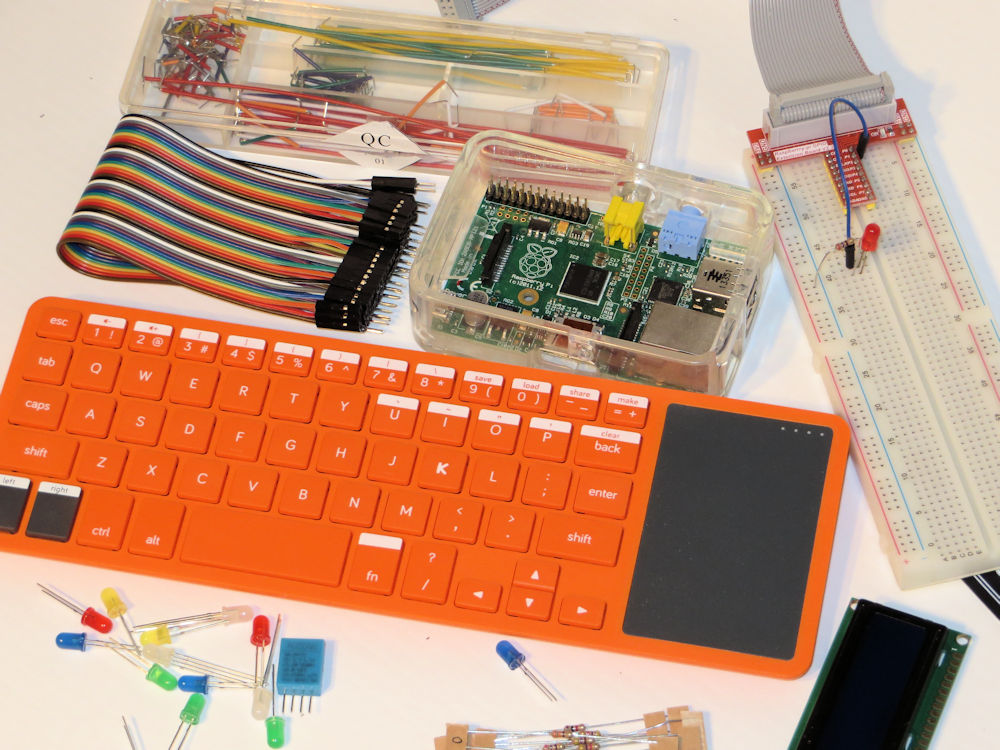
Figure 1 My Kano and components
You will notice on the right side of the photo a breadboard. For those unfamiliar with this, it is a plastic board with rows of holes wired together and that can be connected to the GPIO pins of a Raspberry Pi. This way you can work with resistors, LEDs and other components without having to run individual wires to each pin on the GPIO or use a finger burning soldering iron. You can see the GPIO pins on the Raspberry Pi.
My breadboard currently holds a resistor, an LED and a cable. When I decided to do this I expected to be able to code the tuning on and off of the LED in Java. What I discovered, likely due to incompetent searching, was that most articles and blogs on playing with Pi computers were about using Python or C. I decided to put aside my preference and went with Python. After about five hours over two days I finally turned on and off the LED. It was not as much fun as I hoped for so I put it aside. I used the Raspberry Pi as a prop at the college open house but otherwise it carried out its most common function on my desk as “The Paperweight”.
In December 2015 I came across another Kickstarter project called Wio Link that caught my interest. A company called Seeed had a project for a wireless Grove controller. Grove is the name given to a family of IoT components mounted on a circuit board along with any necessary supporting components such as resistors. Each of this small boards have a 4 pin male connector socket. These components can now plug in to a circuit board called the Grove controller that is Arduino based. The Wio Link Grove controller board is communicated with over Wi-Fi. As I understood it, you could read or write to connected components using HTTP requests.
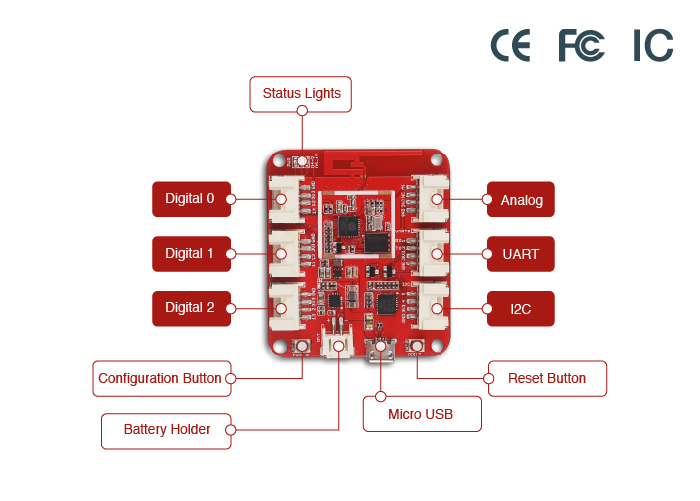
Figure 2 Wio Link board by Seeed Studios
When it arrived in April 2016 I was able to get it to work fairly easily. I leave it to you to read up on the Wio Link at https://iot.seeed.cc/. It worked as advertised, sort of. To use the device, it needed to be configured with the necessary drivers for whatever component you were connecting to it. Here is where it got a bit weird. Every time you used the smartphone app to upload the necessary driver, the server from which the driver came from had to first compile the C code for the driver. The server was in China and the documentation recommended using your own server.
The Wio Link server code was available on GitHub and as a Docker image. I needed a Linux system for this and luckily I had an unused system upon which I installed Ubuntu. Now it was time to load the server software from Seeed. I tried the Docker approach first but to no success. Next I tried the native install. It actually did work, sort of. It appeared that I could connect to my server from my smartphone and I could instruct the server to download the necessary driver to the Wio Link board. When I queried the board via HTTP all I could get was an error message stating that I was using the wrong token. That was disappointing. I will return to this problem this summer.
In my research on the Wio Link I came across the GrovePi+. This is a circuit board that mounts on top of a Raspberry Pi and from which you can access components plugged into the GrovePi+. Here in Montreal there is a store named ABRA Electronics, https://abra-electronics.com/.

Figure 3 ABRA Electronics in Montreal
At ABRA I purchased a Raspberry Pi 3 and a GrovePi+ circuit board. I assumed that the components from the Wio Link would work on the GrovePi+ board, also made by Seeed.

Figure 4 The GrovePi+ circuit board
Another company, Dexter Industries, http://www.dexterindustries.com/, specializes in selling educational kits based on the GrovePi+. They had an offer for teachers of a free three-month loan of a kit after which you returned it or bought it. This kit came with some cool sensors that were not part of the Wio Link kit. I ordered it and it arrived quickly.
I made contact with John Cole from Dexter Industries. On their web site they mention that the languages Python and C# but no Java. John told me that he was unaware of a stable and maintained library for Java and GrovePi. There was the Pi4j library, http://pi4j.com/, but he felt that it was not being maintained. It was also designed to interact with the GPIO of a Pi and not the GrovePi. I told John I would investigate what was out there and report back.
What I discovered in my research were two projects on GitHub that presented code to interact with the GrovePi. The first was JGove, https://github.com/digitalinteraction/jgrove, by Dan Jackson and the second was IoTDevices, https://github.com/emoranchel/IoTDevices, by Eduardo Moranchel. Both are proof of concept code. I hope that from these two projects I can put together a library that can be easily used by anyone to code the GrovePi in Java.
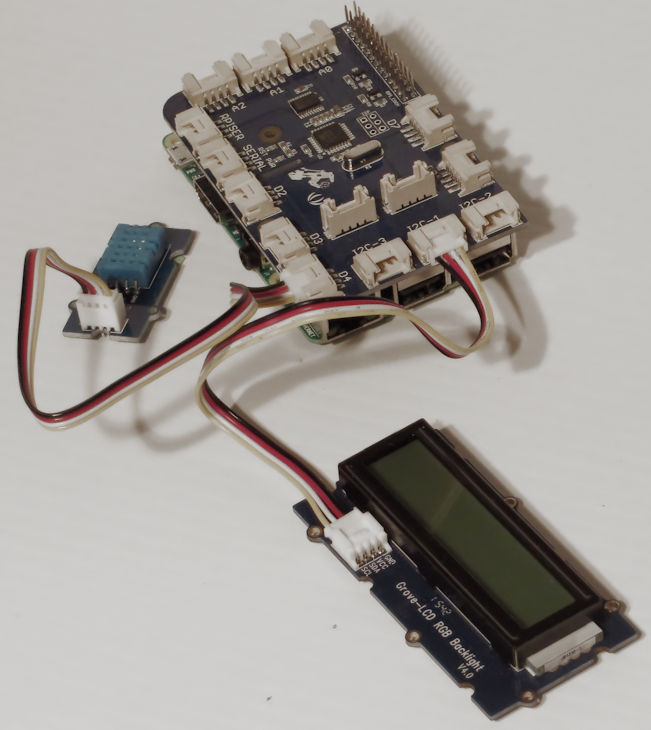
Figure 5 GrovePi+ mounted on a Raspberry Pi 3 with a temperature/humidity sensor and an LCD display
In part 2 I will look more closely at the Grove system. Parts 3 will look at a mashup between Payara Micro and GrovePi+..